

The image above is the situation after Winter 1901. As a reminder, I’m England. France, having gained 3 SCs in 1901 didn’t order any builds; Russia NMRed in F01 and didn’t enter a build, either; Germany NMRed in S01. I didn’t believe any of them were still in the game.
So, where did this leave me? In Heaven. Italy, Austria and Turkey were active in the south. I was free to act as I wanted in the west and the north. Austria would have to break off from their war with Italy to take anything from Germany, and vice versa for Italy. Additionally, Italy could move west to take advantage of the absent France. Turkey had a very simplistic plan: control the Balkans. But they might try to take advantage of the absent Russia. Turkey had the best chance (after me) and this was fine by me: if you want another power doing pretty well as England, it would be Turkey.
Spring 1902
As England I love building fleets first. England has to control the seas. In this game, however, with the likelihood of all three neighbours being abandoned, I changed this policy. Having built a fleet in Edinburgh, I built an army in London. I was close to building two armies, in fact! I needed to take advantage of the free SCs open to me. The problem was that I only had one fleet available to convoy those armies which would slow things down. So one fleet, one army.
Italy’s build – F(Rom) – indicated that they’d come to an arrangement with Austria. The only other SC available for a build was Naples, of course. But, had they built in Naples, the fleet would have been heading east. Given that Turkey had both Mediterranean SCs empty for builds this would probably mean they were going to build at least one fleet. Italy should be defending against that, except that France was absent and, well, French SCs were up for grabs!
To take full advantage of this, though, Italy needed to reach an arrangement with Austria. The fact that they’d been at war for just one year would have helped, I’m guessing. But it seemed that either Italy was going to use just their two fleets to push west or that the Austro-Italian war was over. For me, the latter: Italy was getting nothing from Austria doing that.
So, what did that mean? If they’d had any sense, Austria and Turkey would have reached an arrangement, too. Working together, they could split Russia before I had any chance to take advantage of it.
In messages with Turkey, however, their peculiar fascination of Balkans dominance remained in place, however. That was also fine with me! If they were going to attack Austria seriously, they wouldn’t be able to push more than a couple of units north. It would also tie Austrian units down. If this happened, I’d have some breathing space before pushing into Russia.
My decision, then, was to focus on capturing Scandinavia and St Petersburg, capturing the Low Countries, and Brest. That meant getting my army onto the Continent this year. But did I have to do that in Spring? I could convoy F Lon-Den but then what would I do with F(Edi)? So I decided not to do this yet.
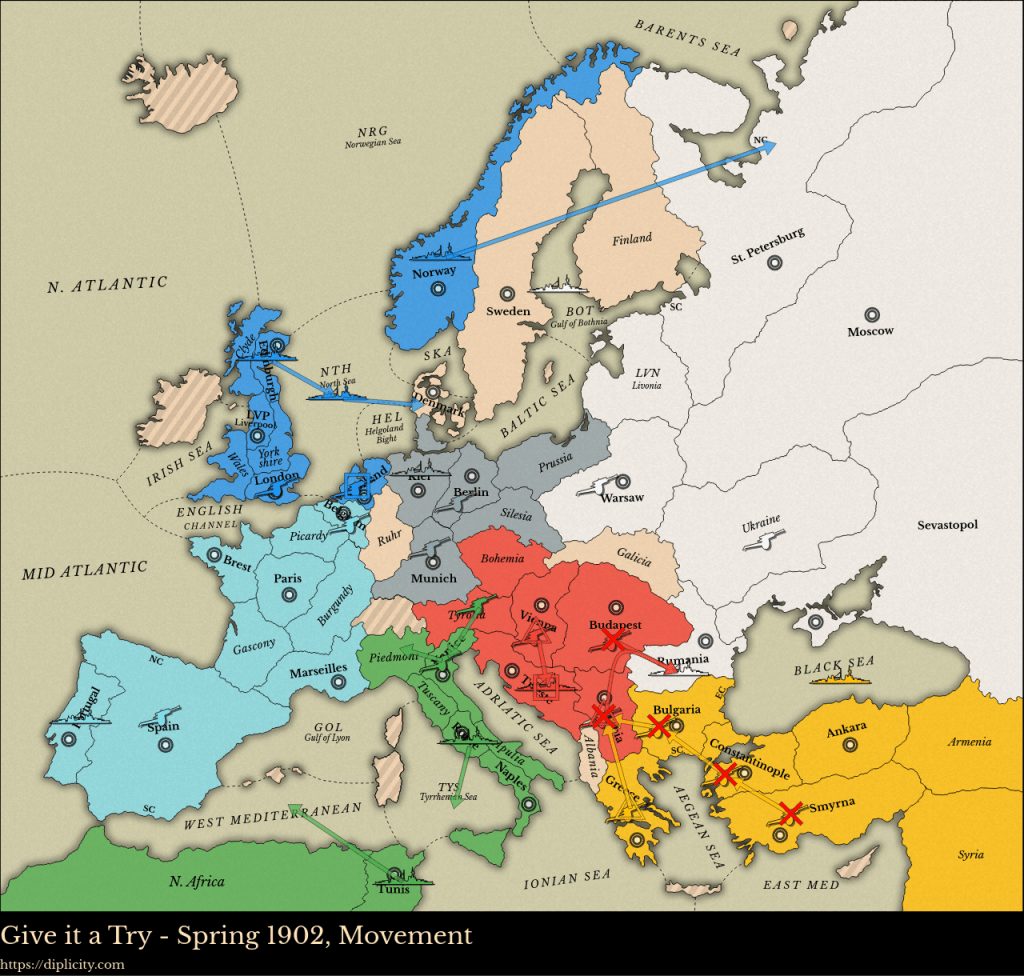
- F Nwy-Stp, F NTH-Den, F Edi-NTH, A Hol H, A Lon H
- F Por H, A Spa H, A Bel H
- F Tun-WMS, F Rom-TYS, A Ven-Pie, A Tyl-Ven
- F Kie H, A Ber H, A Mun H
- A Vie S Tri H, A Ser S Bud-Rum
- F BLA H, A Gre-Ser, A Bul-Ser, A Con-Bul, A Smy-Bul
- F GOB H, F Rum H, A Ukr H, A War H
Fall 1902
So, Italy and Austria ended their war, although it’s clear that Austria didn’t trust it. Still, Austria did try to take Rumania… or did they? Really, Turkey should have moved to Rumania. However, I think Turkey was well-and-truly stuck on capturing the Balkans. Why else have F(BLA) hold? What use is that order? At the very least, F BLA-Sev; better still, F BLA S Bul-Rum.
If it wasn’t crystal clear already, Turkey was a complete novice, strategically. They hadn’t messed-up any moves (until now) but they were strategically naive. And then there was the bounce in Serbia from A(Gre) and A(Bul).
I asked Turkey if this was a misorder; I didn’t get a reply. In some ways I was happy to leave Turkey to bumble their attacks against Austria as it kept them both tied down and cleared the way for me. Honestly, if Austria was a decent player – and with the number of games they had behind them they ought to be – they’d do everything they could to end this conflict. But, given that it looked like Italy had broached the subject with Austria due to Austria’s distrust of Italy, that didn’t look likely to happen. So Turkey was strategically poor and Austria seemed to think one-dimensionally.
However, Italy had woken up and could see that France was ripe for the taking – well, Marseilles and Iberia, anyway – and were heading west. I could see a scenario, not that far down the line, where Italy would get a fleet into the MAO. I’d have to prevent that. Given the free builds I was going to get, this wouldn’t be a problem, but it was one I’d rather not face in the long term. So I could do with Austria and Turkey giving Italy more attention.
One problem was Austria being about as communicative as a mute slug. They must have been talking to Italy; were Austria and Turkey communicating? Turkey was corresponding with me; Austria was silent. I get it: Austria isn’t always interested in talking to England unless they can work together on the board. But it’s a poor player who doesn’t keep their channels of communication open. I also suspect they weren’t talking to Turkey… and that Turkey, lacking the strategic knowledge, would be talking to Austria.
My plan, then, was to keep plugging away at Turkey to end the war with Austria. I guessed I’d have to become increasingly blunt with this. With Italy going west, and gaining 3 SCs – Marseilles, Spain and Portugal – that Italy would be able to use these builds to affect the east.
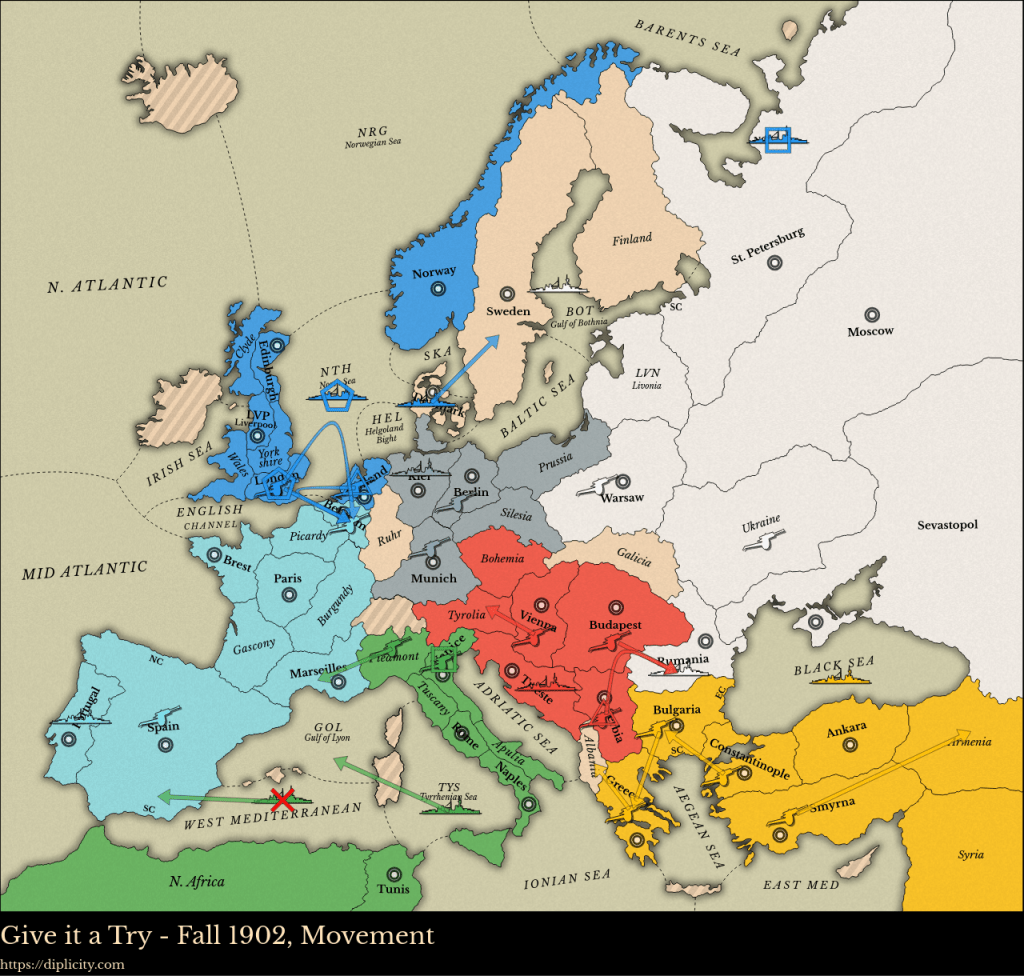
- F NTH C Lon-Bel, A Hol S Lon-Bel, F Den-Swe, F Stp H Gains: St Petersburg, Sweden, Belgium
- F Por H, A Spa H, [A Bel H – dislodged] Loss: Belgium
- F WMS-Spa, F TYS-GOL, A Pie-Mar, A Ven H Gain: Marseilles
- F Kie H, A Ber H, A Mun H
- F Tri H, A Vie-Tyl, A Ser S Bud-Rum Gain: Rumania
- F BLA H, A Gre-Alb, A Bul-Gre, A Con-Bul, A Smy-Arm
- F GOB H, [F Rum H – dislodged], A Ukr H, A War H Loss: Rumania
Why did I concentrate on Belgium and Sweden? Well, I could see that I would need to get armies into central Europe eventually but I wanted to tie up France if I could. Italy would move A Pie-Mar and I didn’t want them pushing into Paris without challenging that soon. If I could get an army into France then I’d have some say in what happened there, rather than just standing back. As far as Sweden v Denmark was concerned, it didn’t really matter. Both would let me move out to the Baltic Sea, and that would let me get into Kiel and Berlin also. But Denmark was closer to England and, if I could leave Denmark until I needed to take an SC or two to win later, that would be a quicker gain than Sweden.
I was getting 3 builds. That would surely get everyone’s attention. I wasn’t worried about Turkey – they were fixated. Austria would see it, surely, as a threat but I guessed Turkey’s continuing pressure would keep them busy. I expected Italy would be nattering at them about what I was being able to do – but, with F WMS-Spa, it seemed they didn’t trust that France was absent.
Turkey were still making mistakes. They failed to make any gains, despite the fact that they should have taken two from Sevastopol, Rumania or Serbia. Instead, they played what they might have done in S02, and played for position.
Meanwhile, Austria still didn’t trust Italy – why else move A Vie-Tyl?
I haven’t mentioned the Retreats phase here as, while it was needed, both dislodged units – France’s A(Bel), and Russia’s F(Rum) – were owned by abandoned powers and both were therefore disbanded.
Winter 1902
My builds were pretty obvious. Fleets and an army. The fleets were to take control of the western seas. The army was to throw at central Europe. Austria would have to build – it really should be in Vienna to give them a chance of taking Munich. But could they afford to do that under threat from Turkey? It could well be A(Bud). Italy? A fleet would let them challenge for the western seas; an army would mean they were still considering a war with Austria.
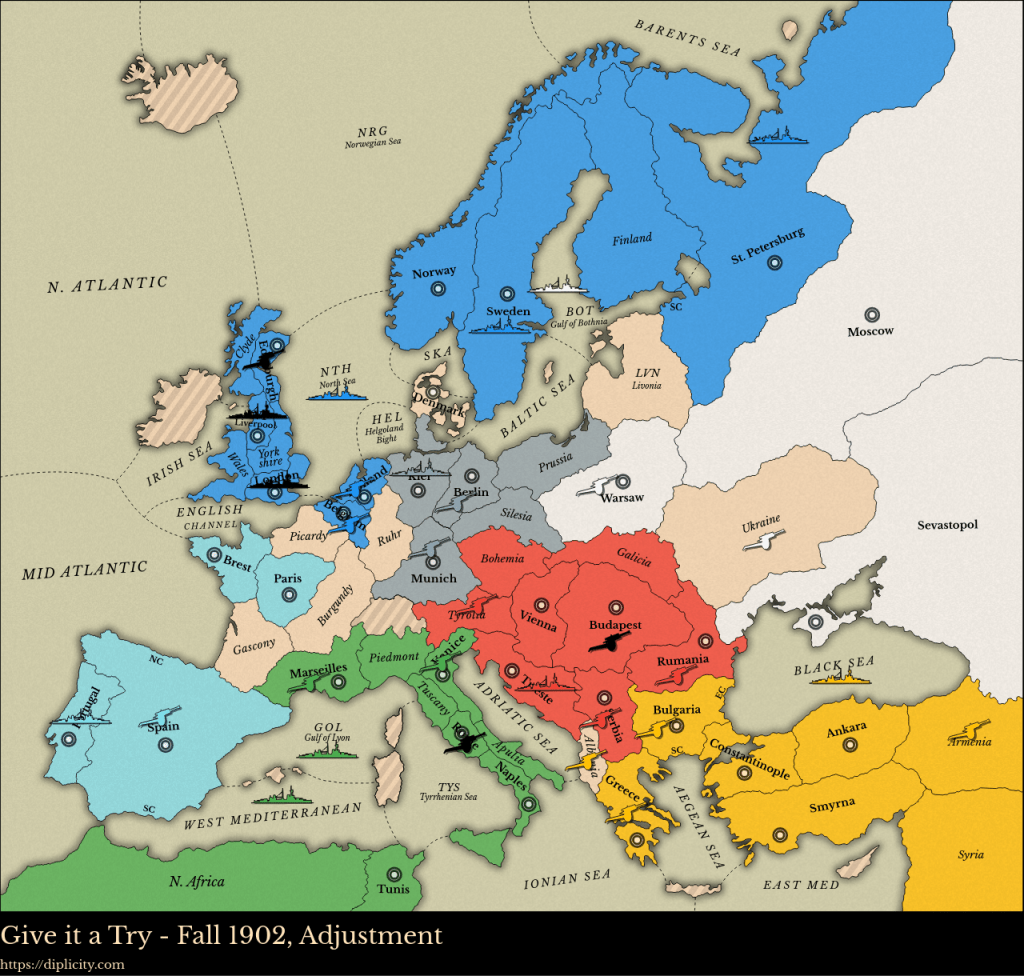
- Builds: F(Lpl), F(Lon), A(Edi) 8 SCs, 8 units
- Disband: A(Bel) 4 SCs, 2 units
- Build: A(Rom) 5 SCs, 5 units
- No change: 3 SCs, 3 units
- Build: A(Bud) 5 SCs, 5 units
- No change. 5 SCs, 5 units
- Disband: F(Rum) 3 SCs, 3 units
Was Austria looking to shore-up their defence against Turkey? Very probably.
It was at this point that I realised Italy could be looking at convoying A(Rom) to Spain. If they were looking to throw their fleets west, that was a mistake.
What now? I had the same issue as I did at the end of 1901: how to maximise my gains.
POSTS IN THIS SERIES


Leave a comment