Above are the W1903 adjustments. As you can see, Turkey took my advice and managed to get a build. Still, no opposition to my cake walk.
Assuming Turkey now knew what they were doing, Austria’s time was over. Of course, there was always the chance that Austria, Italy and Turkey would get their act together and oppose me. Italy, however, had backed away from possibly breaking through into the Mid-Atlantic in favour of fighting Austria. What was going through their heads!?!
Spring 1904
At this point, my Diplomacy was at zero. It was a Gunboat game, now, effectively. At least for me. I actually doubt there was much – if any – diplomacy going on between the southern powers, too. So let’s just look at my moves.

- F ENG C Lon-Bre, A Bur S Bre-Gas, F IRI-MAO, F Lpl-NAO, F NWG C Edi-Nwy, F BAL C Kie-Lvn, A Mun H
- F Por H
- F Spa(sc)-MAO, A Mar-Spa, A Tyl S Ven-Tri, F TYS-Nap
- A Ber H
- F ION-Tun, A Rum-Gal, A Bud-Vie, A Ser S Tri H [Disbanded]
- A Alb S Ser H, A Gre-Ser, A Bul-Rum, A Sev S Rum H, F BLA S Rum H, A Bul-Rum
- A War H, A Ukr H
All I was interested in now was taking the 18 SCs as quickly and efficiently as I could. Was I able to do this? There may have been a more effective way to do this, but here was the plan.
It would need a two-pronged attack. Take the Mid-Atlantic and make progress in France was one arm of the strategy. I could force MAO in Spring but decided against this. I wanted to get my A(Lon) into France so I convoyed via ENG. Bur S Bre-Gas was important – I didn’t want Italy spotting this and bouncing it. As it happens, Italy didn’t spot it but, well, what else was Burgundy doing anyway?
In the meantime, F Lpl-NAO put another fleet bordering MAO, while F IRI-MAO was meant to bounce F Spa(sc)-MAO… or take the Mid-Atlantic. As I thought, it bounced but that wasn’t a problem.
I avoided trying to take Berlin. I could’ve used A Kie S Mun-Ber, and then taken Munich back, and that would have been good, but I really wanted to get into the Russian centre. So I convoyed A(Kie) to Livonia in preparation for working with the army that would be in St Petersburg after Fall 04 to take Moscow.
Unfortunately, due to not having any diplomacy to do, I had finalised my orders and so Turkey didn’t read my messages to them explaining how to enter support orders before S04 resolved. So they were still messing things up. Hopefully that would change in F04.
In the meantime, Italy and Austria were still fighting each other, and Turkey and Austria continued to bump heads, ineffectively. The only interesting move in the south was Austria’s A Rum-Gal, which allowed Turkey to take Rumania, despite misorders with support. What was going on here? Was Austria trying to protect Warsaw?
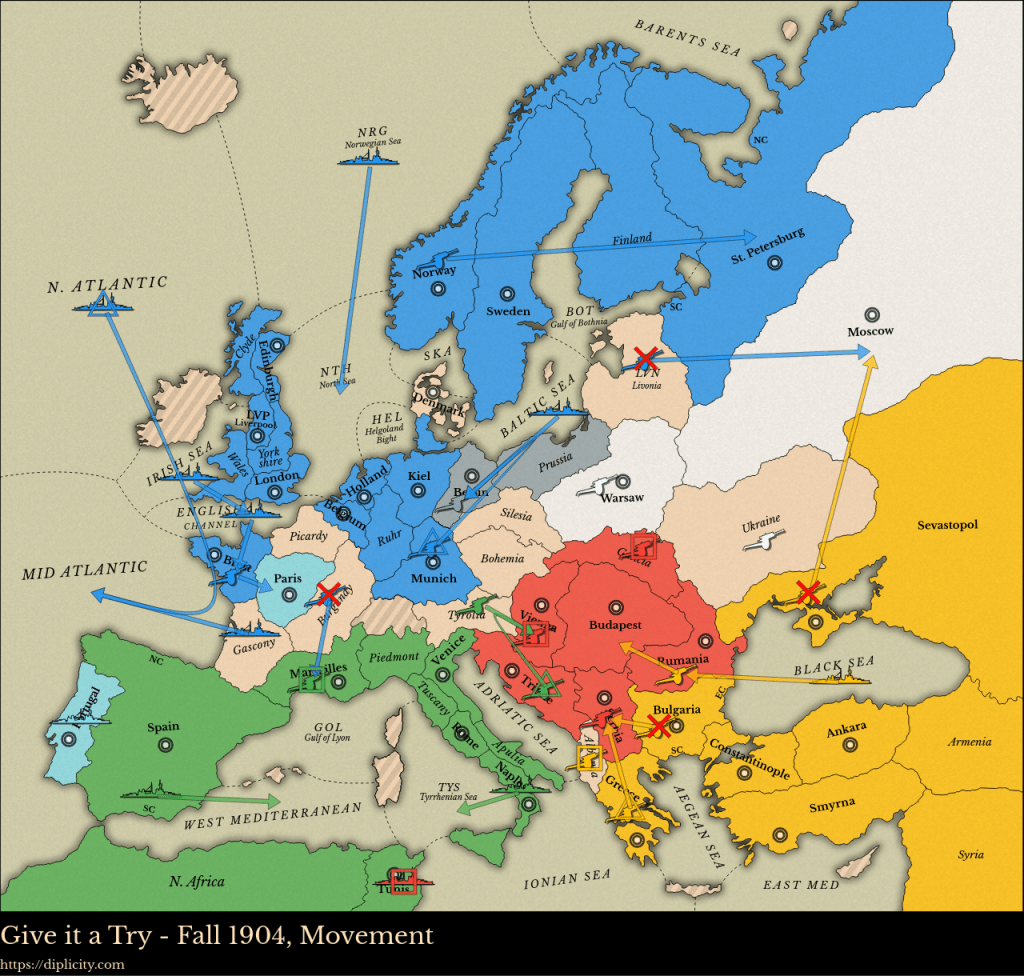
Fall 1904

- F NAO S Gas-MAO, F NAO S Gas-MAO, A Bur-Mar, A Bre-Par, F ENG-Bre, F IRI-ENG, F NWG-NTH, A Mun S BAL-Ber, A Lvn-Mos, A Nwy-Stp Gains: Paris, Berlin – 2 builds
- F Por H
- F Spa(sc)-WMS, A Mar H, F Nap-TYS, A Tri S Tyl-Vie Gains: Trieste, Vienna; Loss – Tunis – 1 build
- A Ber H [Dislodged] Loss: Berlin – 1 disband
- A Vie H [Dislodged], A Gal H, F Tun H, A Ser unordered – HOLD Gain: Tunis; Losses: Trieste, Vienna, Budapest, Rumania – 2 disbands
- A Sev-Mos, A Rum-Bud, F BLA-Rum, A Alb H, A Bul-Ser, A Gre S Ser H Gains: Rumania, Budapest – 2 builds
- A War H, A Ukr H
In this turn I changed my mind about a couple of things. I was intending to hold back on Denmark and Paris; originally I ordered A Bur S Bre-Gas. But I looked at things and wondered what I was going to do with F(BAL) and could really only see it moving to Berlin. That would give me a build. But it was the only build I was likely to get. I would order A Lvn-Mos to bounce a possible A Sev-Mos by Turkey (which happened) so I decided, in the interests of speed, to take Moscow. On the off-chance that Italy would order A Mar-Gas, I ordered A Bur-Mar, which was unsuccessful as Italy had A(Gas) hold. F NWG-NTH was to allow a convoy next year.
Turkey, despite acknowledging my help, still couldn’t order support to save their life; they were lucky that Austria seemed to have given up the ghost, not even bothering to enter an order for A(Ser). Austria’s only SCs now were Serbia and Tunis (although it looked like Serbia would last forever!).
Winter 1904
- Build: A(Edi), A(Lon)
- Disband: F(Tun)
I built two armies – I really didn’t need any more fleets. The northern seas were unchallenged and I was in the Mid-Atlantic with plenty of fleets there; besides, Italy was giving me free reign.
Austria didn’t order a retreat for A(Vie) so it was disbanded – had they ordered that or was it removed due to no retreat order? And they disbanded F(Tun). That was a tricky one to predict: it could have been an auto-disband, given that it was furthest away from Austria’s SCs but, according to the rules, units in non-SCs should be disbanded before units in SCs. That doesn’t mean that this was Diplicity’s way of doing things, though! On the other hand, if Austria was still in the game, then they might have chosen this unit anyway as Tunis was lost and A(Gal) was more useful.
POSTS IN THIS SERIES


Leave a comment